TRENDING
Easy Fudgy Brownies Recipe From Scratch

8 min read
Last updated November 9, 2026
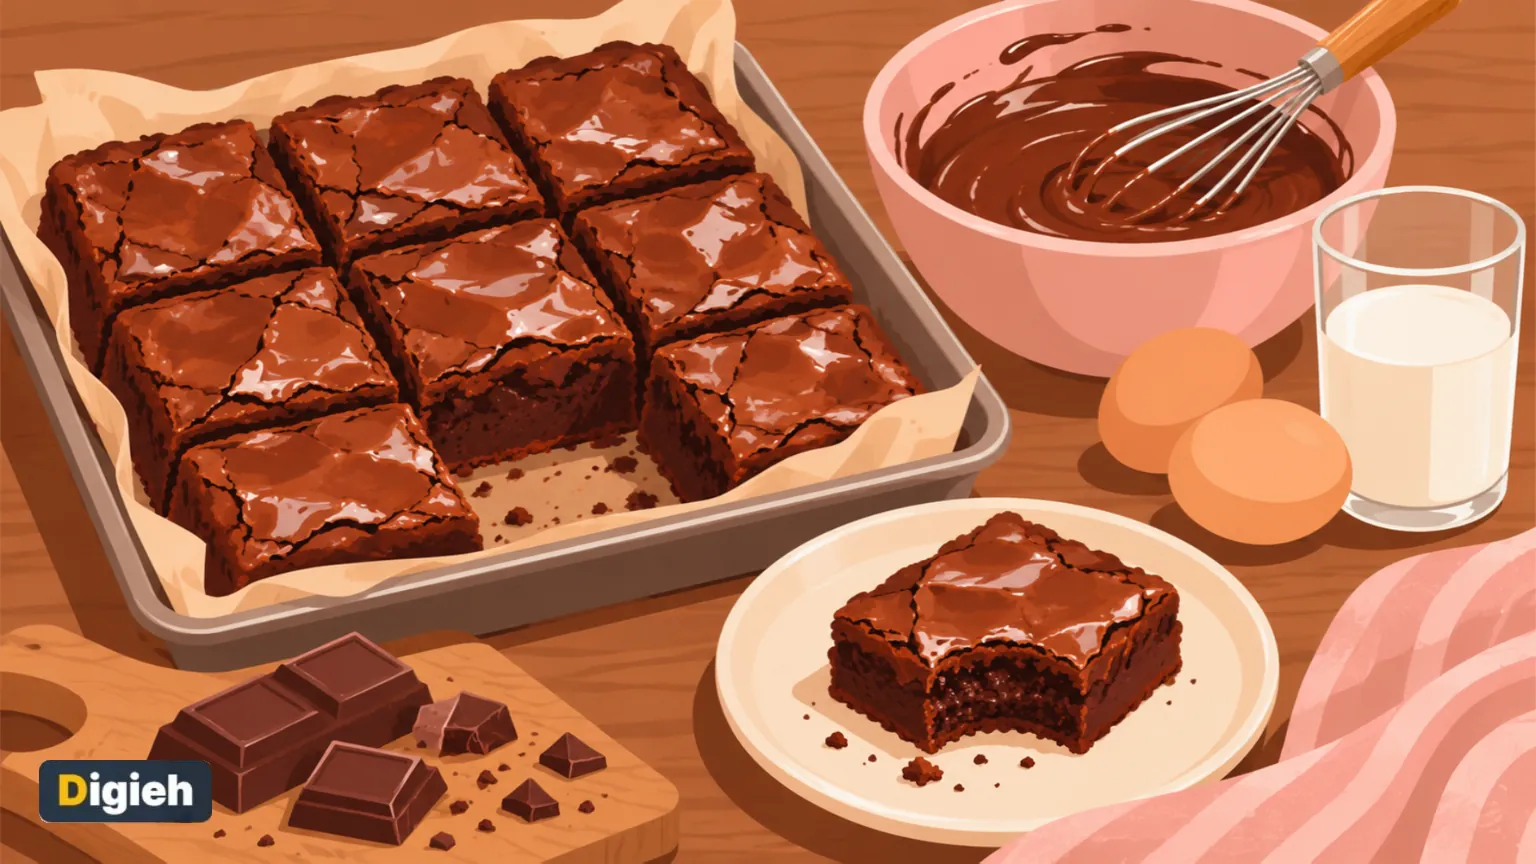
These easy fudgy brownies use melted butter, real chocolate, cocoa powder and just a little flour. They bake in about 25 minutes in an 8 by 8 inch pan. Each square is rich and gooey, with a shiny, crackly crust.
No mixer needed, just one bowl and a whisk. Below you will find the full recipe and the secrets to a glossy top. You will also find easy ways to make them your own.
Recipe at a Glance
| Detail | Info |
|---|---|
| Prep time | 15 minutes |
| Bake time | 25 to 30 minutes |
| Cooling time | At least 1 hour |
| Servings | 16 squares |
| Pan size | 8 by 8 inch |
| Difficulty | Easy |
Inside this guide
- Ingredients
- Step-by-step directions
- Fudgy vs. cakey brownies
- How to get a shiny top
- How to check doneness
- Mix-ins and variations
- Storing and freezing
- Baking safety
- Frequently asked questions
Why These Brownies Work
Great brownies balance chocolate, fat and sugar with just enough flour to hold them together. Using both melted chocolate and cocoa gives deep flavor without being too sweet.
- Melted butter makes them dense and fudgy.
- Whisking the eggs and sugar well creates a glossy top.
- A small amount of flour keeps the center gooey.
- Everything mixes in one bowl, so cleanup is quick.
Ingredients
- 1/2 cup (1 stick) unsalted butter
- 4 ounces dark or semisweet chocolate, chopped
- 1 cup granulated sugar
- 2 large eggs, at room temperature
- 1 teaspoon vanilla extract
- 1/2 cup all-purpose flour
- 1/4 cup unsweetened cocoa powder
- 1/4 teaspoon salt
- 1/2 cup chocolate chips, optional
Good chocolate makes a big difference. Choose a bar you would enjoy eating on its own.
Choosing Chocolate and Cocoa
The chocolate you pick shapes the flavor more than any other ingredient. Semisweet chocolate gives a classic, crowd-pleasing taste.
Dark chocolate with 60 to 70 percent cacao makes richer, less sweet brownies. Milk chocolate makes them sweeter and softer.
- Natural cocoa powder tastes bright and slightly fruity.
- Dutch-process cocoa tastes smoother and looks darker.
- Either works here, since this recipe uses no baking soda.
- Chocolate chips hold their shape, while chopped bars melt into pools.
Step-by-Step Directions
Step 1. Prepare the pan
Heat your oven to 350 degrees Fahrenheit. Line an 8 by 8 inch pan with parchment paper. Leave extra paper hanging over two sides so you can lift the brownies out later.
Step 2. Melt the butter and chocolate
Melt the butter and chopped chocolate together in a heatproof bowl. Use the microwave in 30-second bursts, stirring between each, or set the bowl over a pot of barely simmering water.
Stir until smooth, then let it cool for five minutes. Very hot chocolate can scramble the eggs.
Step 3. Whisk in the sugar and eggs
Whisk the sugar into the chocolate mixture. Add the eggs one at a time, then the vanilla. Whisk hard for about one minute until the batter turns thick and glossy.
Step 4. Fold in the dry ingredients
Sift the flour, cocoa and salt over the bowl. Fold gently with a spatula just until no dry streaks remain, then stir in the chocolate chips.
Step 5. Bake
Spread the batter evenly in the pan. Bake for 25 to 30 minutes, until the edges look set and the center is just barely firm.
Step 6. Cool completely
Let the brownies cool in the pan for at least one hour before slicing. They keep setting as they cool.
Pro tip. For extra-clean squares, chill the cooled brownies for 30 minutes. Then cut with a sharp knife wiped clean between cuts.
Which part of the brownie pan is your favorite?
- Chewy edges
- Gooey middle
- Corners
- I love them all
Fudgy vs. Cakey Brownies
The ratio of fat to flour decides the texture. More butter and chocolate make fudgy brownies, while more flour and leavening make them cakey.
| Texture | What to change |
|---|---|
| Extra fudgy | Use less flour and slightly underbake |
| Chewy | Add an extra egg yolk and some brown sugar |
| Cakey | Add 1/4 cup more flour and 1/2 teaspoon baking powder |
This recipe sits on the fudgy side. Adjust it to match your favorite style.
How to Get a Shiny, Crackly Top
That papery, glossy crust forms when sugar dissolves and rises to the surface during baking.
- Whisk the eggs and sugar hard for a full minute.
- Use warm, not hot, melted chocolate and butter.
- Use granulated sugar, which dissolves well.
- Do not overmix once the flour goes in.
Do not worry if your top is not perfectly shiny. The brownies will still taste wonderful.
How to Tell When Brownies Are Done
Overbaking is the most common brownie mistake. Start checking a few minutes early.
- The edges look dry and start to pull away from the pan.
- The center no longer jiggles when you gently shake the pan.
- A toothpick in the center comes out with moist crumbs, not wet batter.
A completely clean toothpick usually means you baked them too long. They will taste drier and more cakey.
350°FOven temperature for these brownies. Bake them for about 25 to 30 minutes in an 8 by 8 inch pan.
Mix-Ins and Variations
| Variation | How to make it |
|---|---|
| Walnut or pecan | Fold in 1/2 cup chopped toasted nuts |
| Peppermint | Add 1/2 teaspoon peppermint extract and top with crushed candy canes |
| Salted caramel | Swirl caramel sauce on top and sprinkle with flaky salt |
| Peanut butter | Drop spoonfuls of warm peanut butter on top and swirl |
| Espresso | Add 1 teaspoon instant espresso powder to deepen the chocolate |
| Cream cheese | Swirl in a sweetened cream cheese mixture before baking |
Baking for the holidays? Peppermint brownies are perfect for a holiday cookie exchange party.
Gluten-Free and Dairy-Free Swaps
Because this recipe uses so little flour, it adapts well. Swap in a one-to-one gluten-free flour blend for the all-purpose flour. Bake time usually stays about the same, so start checking them at 25 minutes.
For dairy-free brownies, use a plant-based butter and dairy-free chocolate. Check labels carefully, since some dark chocolate contains milk.
Free updates
Join the Digieh list
Be the first to know when our weekly brief launches.
No spam. Unsubscribe anytime. Read our Privacy Policy.
Using a Different Pan
You can double this recipe for a 9 by 13 inch pan. Bake it for about 30 to 35 minutes.
Metal pans bake brownies most evenly. Glass pans hold more heat, so lower the oven to 325 degrees and check early.
A dark nonstick pan can brown edges faster. Watch the edges and pull the pan a few minutes sooner if needed.
Make Brownies With Kids
Brownies are a great first baking project for children. The steps are simple, and the results are always a hit.
- Let kids measure the sugar, flour and cocoa.
- Have them crack the eggs into a separate small bowl first.
- Let an adult handle the hot chocolate and the oven.
- Save the decorating, like sprinkles and powdered sugar, for little hands.
Remind kids not to taste the raw batter. Offer a finished brownie as a reward instead.
Brownies as Gifts
Homemade brownies make a thoughtful holiday gift. Wrap squares in parchment, stack them in a tin and tie it with ribbon.
Add a small tag listing any nuts or other allergens. That helps friends with food allergies enjoy them safely.
Storing and Freezing Brownies
- Store at room temperature in an airtight container for up to 3 to 4 days.
- Refrigerate them for up to a week for a firmer, fudgier bite.
- Freeze individually wrapped squares for up to 3 months.
- Thaw at room temperature or warm briefly in the microwave.
Leave the brownies uncut until you need them. Whole slabs stay moist longer than cut squares.
Baking Safety
It is tempting to lick the spoon, but raw batter can make you sick. The Centers for Disease Control and Prevention warns that eating raw dough or batter can cause food poisoning.
According to the health agency, raw flour can carry germs like E. coli, and raw eggs can carry Salmonella. Germs die only when the batter is fully baked.
- Do not taste raw brownie batter.
- Wash your hands after handling flour and raw eggs.
- Clean bowls, counters and utensils well.
- Keep raw batter away from young children.
Serving Ideas
- Top a warm brownie with vanilla ice cream.
- Dust with powdered sugar for a festive look.
- Drizzle with hot fudge or caramel sauce.
- Pair with a mug of our homemade hot chocolate.
Building a dessert table? Add our Christmas sugar cookies and soft gingerbread cookies.
Common Brownie Mistakes
- Overbaking until a toothpick comes out clean
- Adding eggs to very hot chocolate
- Overmixing after adding the flour
- Cutting them while still warm
- Using the wrong pan size, which changes the bake time
Looking for more sweet ideas beyond pie? See our list of easy Thanksgiving desserts.
Test Yourself
What should a toothpick look like when fudgy brownies finish baking?
- Completely clean
- Moist crumbs, not wet batter
- Covered in wet batter
A few moist crumbs mean the brownies are fudgy but fully baked.
Why should you avoid eating raw brownie batter?
- It tastes bitter
- It ruins your appetite
- Raw flour and eggs can carry germs
The health agency warns that raw flour and eggs can cause food poisoning.
Frequently Asked Questions
Can I use cocoa powder only?
Yes, but the brownies will be less fudgy. Add a little more butter to help.
Why are my brownies dry?
They were likely overbaked. Pull them out sooner next time.
Can I make brownies without eggs?
Yes. Try a flax egg or plain yogurt, though the texture will change.
Do brownies need the fridge?
Not usually. Room temperature is fine for a few days.
Conclusion
These easy fudgy brownies are simple, rich and perfect for any occasion. Melt, whisk, fold and bake, then let them cool before slicing.
Try a fun mix-in, share them with friends and keep a few in the freezer for later.
Found this useful?
Editor’s Note
This recipe is accurate as of November 9, 2026. Food safety advice comes from the Centers for Disease Control and Prevention.
Oven times can vary, so start checking your brownies a few minutes early.
Spot an error in this article? Please contact us at support@digieh.com or read our Corrections Policy.
Keep exploring
Your next read is waiting
 1Fruits & VegetablesWinter Squash Types: How to Pick and Cook9 min read
 2MedicinesMedicines and Alcohol: Which Common Drugs Never Mix9 min read
 3FashionHow to Style a Long Coat Every Day9 min read
 4Science & DiscoveriesQuadrantid Meteor Shower 2027: Best Time to Watch9 min read
 5AI & TechHow to Use AI for Smarter Holiday Shopping9 min read
 6Travel & TourismHow to Pack a Carry-On for a Week9 min read