TRENDING
How to Do a Plank: Perfect Form, Hold Times and a 4-Week Plan

8 min read
Last updated November 9, 2026
The plank looks simple. You hold still and keep your body straight. Yet it ranks among the best exercises for building a strong core, and it needs no equipment at all.
This guide shows you how to plank with good form, how long to hold and how to progress. It also covers common mistakes, easier versions and a four-week plan.
Health note. This article is general fitness information. If you have back, shoulder or wrist pain, are pregnant or recently had surgery, check with a health professional before you start.
Key Takeaways
- A plank works your abs, back, glutes, shoulders and legs at the same time.
- Keep a straight line from your head to your heels.
- Beginners can start with holds of 10 to 30 seconds.
- Good form matters far more than hold time.
- Stop if you feel pain rather than normal muscle fatigue.
Inside this guide
- Why planks are worth doing
- How to do a forearm plank
- How long to hold
- Common mistakes
- Easier versions
- Harder versions
- Four-week plank plan
- Safety tips
- Frequently asked questions
Why Planks Are Worth Doing
Your core includes far more than your six-pack muscles. It covers the deep belly muscles, the muscles along your spine, your hips and your glutes. Together they keep your spine steady when you move.
Banner Health shared plank advice from its sports medicine team. Michela McGertt, a clinical athletic training student with Banner Sports Medicine, explains the payoff. A strong core supports the spine and almost every movement you make.
- Builds core strength without any equipment
- Supports better posture at a desk or on your feet
- Improves balance and stability
- Works the shoulders, chest, arms, glutes and legs as well
- Helps with everyday tasks like carrying groceries or standing on one foot
Because you do not bend your spine, planks are often gentler on the back than crunches. That makes them a popular choice for beginners.
How long can you hold a plank right now?
- Under 20 seconds
- 20 to 60 seconds
- One to two minutes
- Over two minutes
How to Do a Forearm Plank
The forearm plank is the classic version. Follow these steps slowly the first few times.
- Lie face down on a mat or carpet.
- Place your elbows directly under your shoulders, with forearms flat on the floor.
- Tuck your toes under and lift your body onto your forearms and toes.
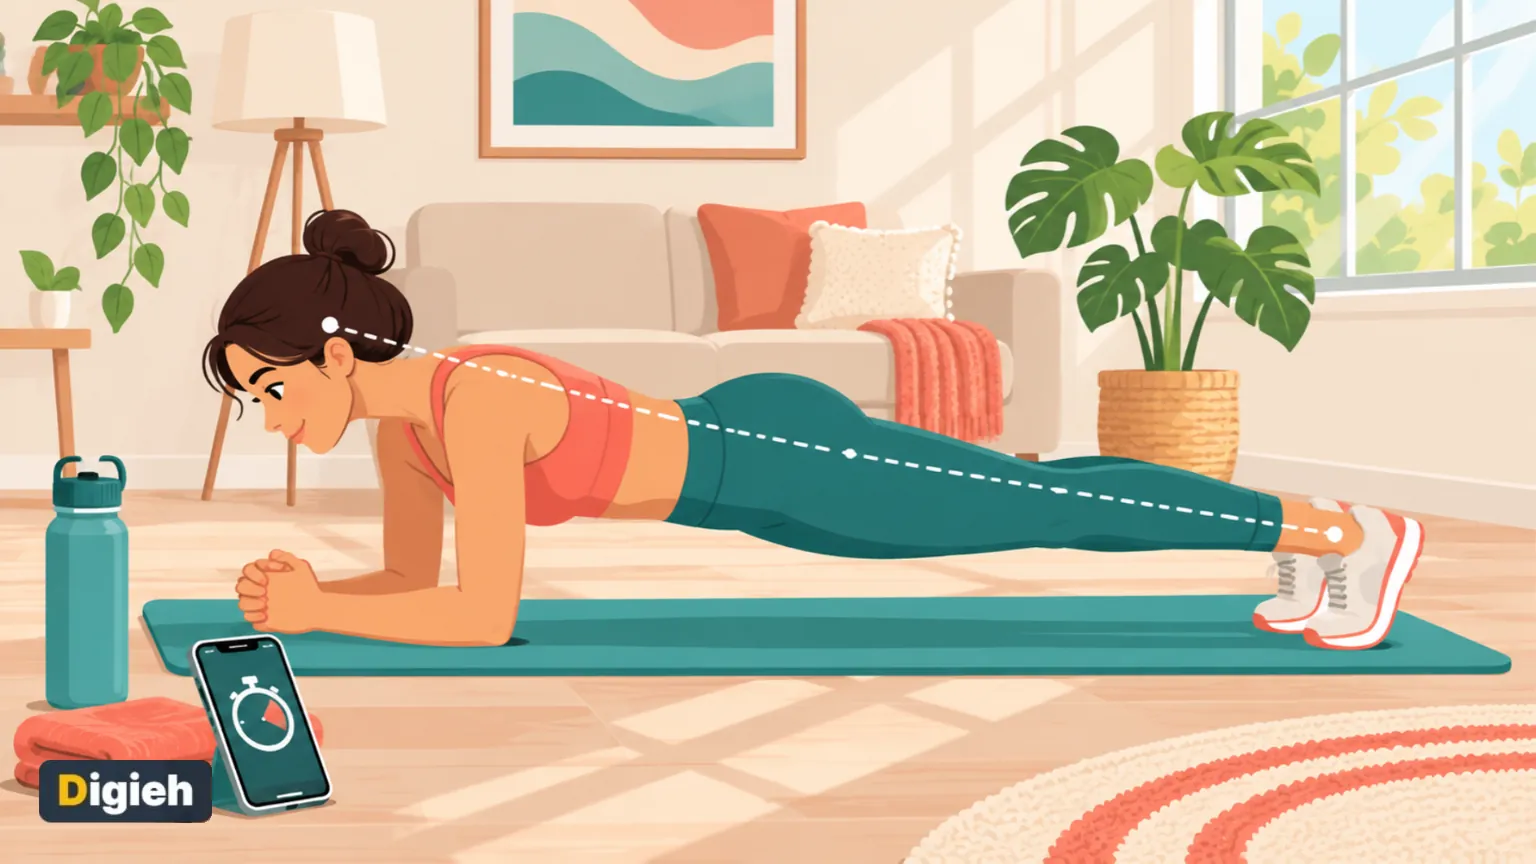
- Make a straight line from your head to your heels.
- Pull your belly button toward your spine to brace your core.
- Squeeze your glutes to protect your lower back.
- Keep your neck neutral by looking at the floor just ahead of your hands.
- Breathe slowly and steadily for the whole hold.
Lower your knees to the floor to finish. Rest briefly, then repeat.
A quick form check
Ask a friend to look at you from the side, or film yourself with your phone. Your back should look flat, like a tabletop. Your hips should sit level with your shoulders.
10-30Seconds per hold is a sensible starting point for beginners.
How Long Should You Hold a Plank?
According to the Banner Health guide, beginners can start with 10 to 30 seconds per round. McGertt stresses a simple rule.
“A shorter plank with good form is better than a longer plank with sloppy form.”
Once your form starts to slip, stop and rest. Holding a sagging plank for longer only strains your back.
| Level | Hold time | Rounds |
|---|---|---|
| Beginner | 10 to 30 seconds | 2 to 3 |
| Intermediate | 30 to 60 seconds | 3 |
| Advanced | 60 to 90 seconds | 3 to 4 |
You do not need marathon holds. Several shorter rounds with perfect form build strength well. Many trainers prefer harder variations over very long holds.
Common Plank Mistakes
| Mistake | What happens | How to fix it |
|---|---|---|
| Hips sagging | Strains the lower back | Squeeze your glutes and brace your belly |
| Hips too high | Takes work away from the core | Lower your hips until your body is flat |
| Holding your breath | Raises tension and cuts the hold short | Breathe slowly in and out |
| Looking forward | Strains the neck | Look at the floor just ahead of your hands |
| Shoulders behind elbows | Stresses the shoulders | Stack shoulders over elbows |
Shaking is normal, especially near the end. Sharp or pinching pain is not, so stop if you feel it.
Easier Plank Versions
If a full plank feels too hard, start with one of these. Each still trains your core.
Wall plank
Stand facing a wall and place your forearms on it at shoulder height. Step your feet back until your body forms a slanted straight line.
Knee plank
Get into a forearm plank but keep your knees on the floor. Keep a straight line from your head to your knees.
High plank
Hold the top of a push-up with your hands under your shoulders. Some people find this easier than the forearm version. Others find it harder on the wrists.
Incline plank
Rest your forearms on a sturdy bench, couch or step. The higher the surface, the easier the plank.
Harder Plank Versions
Once you can hold a forearm plank for 60 seconds with good form, try a harder version.
- Side plank. Balance on one forearm and the side of one foot to work the side of your core.
- Shoulder taps. From a high plank, tap each shoulder with the opposite hand without rocking your hips.
- Leg lifts. Lift one foot a few inches, hold, then switch.
- Plank to push-up. Move from forearms to hands and back again.
- Plank jacks. Jump your feet out and in like a jumping jack.
Add one new variation at a time. Practice each one for a full week before you add another. Keep the same focus on a flat back and steady breathing.
Four-Week Plank Plan
Do this plan three days a week, with a rest day between sessions. Rest 30 to 60 seconds between rounds.
| Week | What to do |
|---|---|
| Week 1 | 3 rounds of 15 to 20 seconds, knee or forearm plank |
| Week 2 | 3 rounds of 25 to 30 seconds, forearm plank |
| Week 3 | 3 rounds of 35 to 45 seconds, plus one side plank of 15 seconds on each side |
| Week 4 | 3 rounds of 45 to 60 seconds, plus one side plank of 20 seconds on each side |
If a week feels too hard, repeat it. Progress at your own pace.
Pair planks with other moves
Planks fit neatly into a short home workout. Try squats, push-ups and glute bridges, then finish with a plank.
For more ideas, see our guide to a budget home gym setup and our jump rope workout for beginners.
Free updates
Join the Digieh list
Be the first to know when our weekly brief launches.
No spam. Unsubscribe anytime. Read our Privacy Policy.
Safety Tips
The Banner Health guide suggests extra care for some people. Talk to a health professional first if any of these apply.
- A history of shoulder, wrist or lower back pain
- Disk problems or arthritis
- Recent surgery
- Pregnancy or the months after giving birth
Stop or switch to an easier version if you feel pain. Normal muscle tiredness and shaking are fine.
Use a mat or folded towel under your forearms for comfort. A soft surface also helps if your knees touch the floor.
How Planks Fit Into Your Week
Planks build strength, but they are only one piece of fitness. Aim for a mix of cardio, strength and stretching.
Walking is an easy way to add cardio on rest days. Our guide on how to start walking for fitness shows you how to begin.
Most adults benefit from strength work for all major muscle groups at least twice a week. Planks make a good finisher for those sessions.
How to Breathe During a Plank
Many beginners hold their breath without noticing. That raises tension and makes you give up sooner.
Breathe in through your nose for a slow count of three. Then breathe out through your mouth for a count of three. Keep your belly braced the whole time, as if someone might poke it.
If you cannot breathe steadily, the hold is too hard. Switch to an easier version until your breathing stays calm.
Planks for Older Adults
Planks can help older adults keep the core strength they need for balance. A strong core may make it easier to get up from a chair or recover from a stumble.
Start with a wall plank or an incline plank on a sturdy counter. These versions put less load on the shoulders and wrists.
Move to the floor only when the easier versions feel steady. Keep a chair nearby to help you get up and down safely.
Track Your Progress
A simple log keeps you motivated. Write down the date, the version you did and how long you held it with good form.
- Use the stopwatch on your phone for each round.
- Note how your form felt, such as steady or shaky.
- Test your best hold once every two weeks.
- Celebrate small wins, like five extra seconds.
Over a month, those small gains add up. Most people notice better posture and an easier time with daily tasks.
Plank Myths
| Myth | Fact |
|---|---|
| Longer holds always mean better results | Good form and harder variations matter more. |
| Planks burn belly fat | You cannot burn fat from one spot. Overall habits matter. |
| Planks only work the abs | They work the shoulders, back, glutes and legs too. |
| You need to plank every day | Two to four sessions a week are plenty. |
Test Yourself
Where should your elbows sit in a forearm plank?
- Far in front of your shoulders
- Directly under your shoulders
- Next to your hips
Stacking elbows under shoulders protects the shoulder joints.
What should you do when your hips start to sag?
- Stop and rest
- Hold on for as long as you can
- Lift your head to look forward
A sagging plank strains the lower back, so rest and reset.
Frequently Asked Questions
Is a 1-minute plank good?
Yes. A minute with good form shows solid core strength.
Can I plank every day?
You can, but rest days help muscles recover.
Do planks help back pain?
They may help some people. Ask a professional first.
Why do I shake during a plank?
Shaking means your muscles are working hard.
Conclusion
The plank is simple, free and effective. Keep your elbows under your shoulders, brace your core and hold a straight line.
Start with short holds, focus on form and progress a little each week. Stop if anything hurts.
Found this useful?
Editor’s Note
This guide is accurate as of November 9, 2026. It draws on plank guidance from Banner Health and its sports medicine team.
It is general fitness information, not medical advice. Talk to a health professional if you have an injury or health condition.
Spot an error in this article? Please contact us at support@digieh.com or read our Corrections Policy.
Keep exploring
Your next read is waiting
 1FashionHow to Waterproof Boots for Winter, Step by Step8 min read
 2Home & KitchenHomemade Christmas Ornaments: 10 Easy Ideas to Make8 min read
 3SportsAP Top 25 College Football Rankings: Georgia Takes No. 14 min read
 4MedicinesGrapefruit and Medicine: Which Drugs Interact and Why8 min read
 5HealthEczema in Winter: How to Calm Dry, Itchy Skin8 min read
 6Travel & TourismREAL ID Explained: What You Need to Fly in 20268 min read